vscode 定制开发 —— Workbench 源码解读及实战
前言
VS Code 插件开发前前后后也看了一段时间,之前尝试对 ActivityBar 做过一些拓展,但是对于一些涉及 UI 改造的高级功能没有多少头绪,在研究了基于 VS Code 开发的类似产品如快应用开发工具、TaoBao Editor 等,有一些思路,然后慢慢摸索出一些思路。目前关于界面二次改造的文章真的比较稀少,本文试着做一些讲解。
之前写过一篇 vscode 定制开发的基础文章,如果对 VS Code 定制开发暂时还没有了解的,可以戳这里:vscode 定制开发——基础准备。
Electron 基础准备
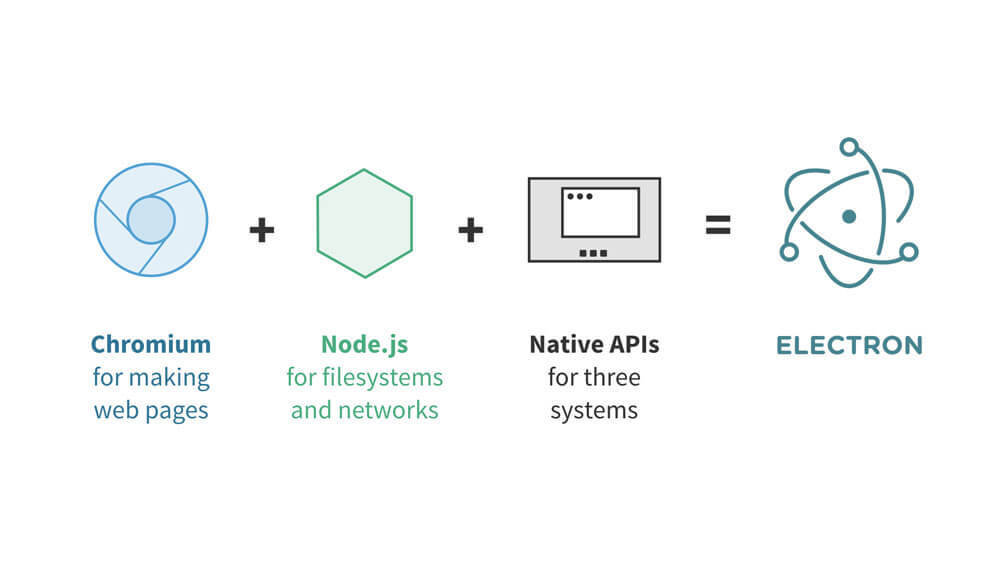
之前我们简单了解了一下 Electron 是基于 Chromium + Node.js 的架构。
快速入门
前面我们说过 VS Code 的主界面是通过 Electron 渲染的,VSCode 的工作区即是一个 Electron 的 BrowserWindow,我们可以从打造你的第一个 Electron 应用 学习 Electron 的最简例子如下:
electron-quick-start/
├── package.json
├── main.js
├── renderer.js
└── index.html
main.js:
const { app, BrowserWindow } = require("electron");

function createWindow() {
  // 创建浏览器窗口
  let win = new BrowserWindow({
    width: 800,
    height: 600,
    webPreferences: {
      nodeIntegration: true
    }
  });

  // 加载index.html文件
  win.loadFile("index.html");
}

app.on("ready", createWindow);具体参考:打造你的第一个 Electron 应用
主进程和渲染器进程
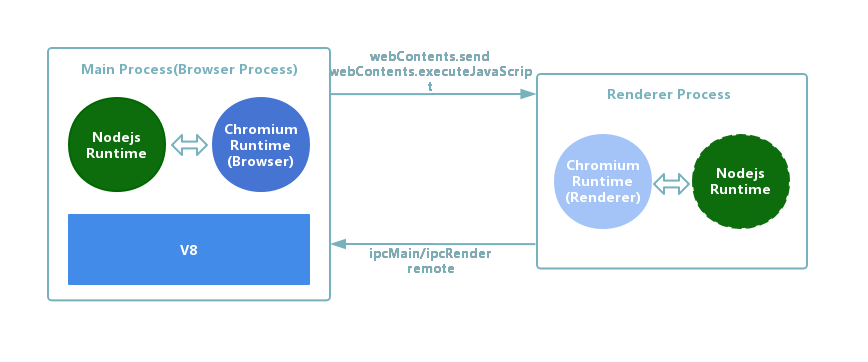
Electron 和 Chromium 类似,分为主进程(main process)和渲染器进程(renderer processes)。
主进程:Electron 运行 package.json 的 main 脚本的进程被称为主进程。一个 Electron 应用总是有且只有一个主进程。主进程使用 BrowserWindow 实例创建页面。与创建 GUI 相关的接口只应该由主进程来调用。
渲染进程:Electron 里的每个页面都有它自己的进程,叫作渲染进程。由于 Electron 使用了 Chromium 来展示 web 页面,所以 Chromium 的多进程架构也被使用到。每个 BrowserWindow 实例都在自己的渲染进程里运行页面,当一个 BrowserWindow 实例被销毁后,相应的渲染进程也会被终止。
在页面中调用与 GUI 相关的原生 API 是不被允许的,因为在 web 页面里操作原生的 GUI 资源是非常危险的,而且容易造成资源泄露。如果你想在 web 页面里使用 GUI 操作,其对应的渲染进程必须与主进程进行通讯,请求主进程进行相关的 GUI 操作。
进程间通讯
Electron 为主进程和渲染进程通信提供了多种实现方式:
- 利用 ipcMain 和 ipcRenderer 模块进行 IPC 方式通信
- 利用 remote 模块进行 RPC 方式通信
这里我使用 electron-vue 为例验证 Electron 进程间通讯方式。
利用 ipcMain 和 ipcRenderer 模块进行 IPC 方式通信
主进程向渲染进程发送消息:从主进程到渲染器进程的消息传递,主进程利用 BrowerWindow.webContents.send() 发送消息,渲染进程利用 ipcRenderer 接收消息。
主进程:
mainWindow.webContents.on("did-finish-load", () => {
  mainWindow.webContents.send(
    "sendMessageFromMainProcesses",
    "主进程向渲染进程发送消息"
  );
});
渲染进程:
electron.ipcRenderer.on("sendMessageFromMainProcesses", (event, message) => {
  console.log(message);
});渲染进程向主进程发送消息:从渲染器进程到主进程的消息传递,渲染进程可以通过 ipcRenderer 模块的 send 方法向主进程发送异步消息及 sendSync 方法向主进程发送同步消息,主进程利用 ipcMain 接收消息,并通过 event.sender.send 或者 event.reply(...) 设置回复消息。
ipcRenderer.send(channel[, arg1][, arg2][, ...])
发送异步消息
参数:
- channel String
- ...args any[]
通过 channel 发送异步消息到主进程,可以携带任意参数。 在内部,参数会被序列化为 JSON,因此参数对象上的函数和原型链不会被发送。
渲染进程:
electron.ipcRenderer.send(
  "sendMessageFromRendererProcesses",
  "渲染进程向主进程发送异步消息"
);
主进程:
electron.ipcMain.on("sendMessageFromRendererProcesses", (event, message) => {
  event.sender.send("sendMessageFromMainProcesses", "回应异步消息:" + message);
});
ipcRenderer.sendSync(channel[, arg1][, arg2][, ...])
发送同步消息
参数:
- channel String
- ...args any[]
返回值:any - 由 ipcMain 处理程序发送过来的值。
通过 channel 发送同步消息到主进程,可以携带任意参数。在内部,参数会被序列化为 JSON,因此参数对象上的函数和原型链不会被发送。主进程可以使用 ipcMain 监听 channel 来接收这些消息,并通过 event.returnValue 设置回复消息。
注意: 发送同步消息将会阻塞整个渲染进程,你应该避免使用这种方式 - 除非你知道你在做什么。
渲染进程:
let reply = electron.ipcRenderer.sendSync(
  "sendMessageSyncFromRendererProcesses",
  "渲染进程向主进程发送同步消息"
);
主进程:
electron.ipcMain.on("sendMessageFromRendererProcesses", (event, message) => {
  event.returnValue = `回应同步消息:${message}`;
});
无论是 BrowerWindow.webContents.send() 还是 ipcMain 和 ipcRenderer,都是 EventEmitter 类的实例,EventEmitter 类由 NodeJS 中的 events 模块导出。
利用 remote 模块进行 RPC 方式通信
remote 模块为渲染进程(web 页面)和主进程通信(IPC)提供了一种简单方法。在 Electron 中, GUI 相关的模块 (如 dialog、menu 等) 仅在主进程中可用, 在渲染进程中不可用。 为了在渲染进程中使用它们, ipc 模块是向主进程发送进程间消息所必需的。 使用 remote 模块, 你可以调用 main 进程对象的方法, 而不必显式发送进程间消息, 类似于 Java 的 RMI 。
在渲染进程中,可以通过 require('electron').remote 获取到 remote 对象,通过 remote 对象可以让渲染进程访问/使用主进程的模块。例如从渲染进程创建浏览器窗口:
const { BrowserWindow } = require("electron").remote;
let win = new BrowserWindow({ width: 800, height: 600 });
win.loadURL("https://github.com");
RMI 的技术原理
官方文档在 remote 模块的介绍中提到了它的实现类似于 Java 中的 RMI,那么 RMI 是什么? remote 的黑魔法是否藏在这里面?
RMI (Remote Method Invoke) 远程方法调用是一种计算机之间利用远程对象互相调用实现双方通讯的一种通讯机制。使用这种机制,某一台计算机上的对象可以调用另外一台计算机上的对象来获取远程数据。
如果使用 http 协议来实现远程方法调用,我们可能会这么实现:
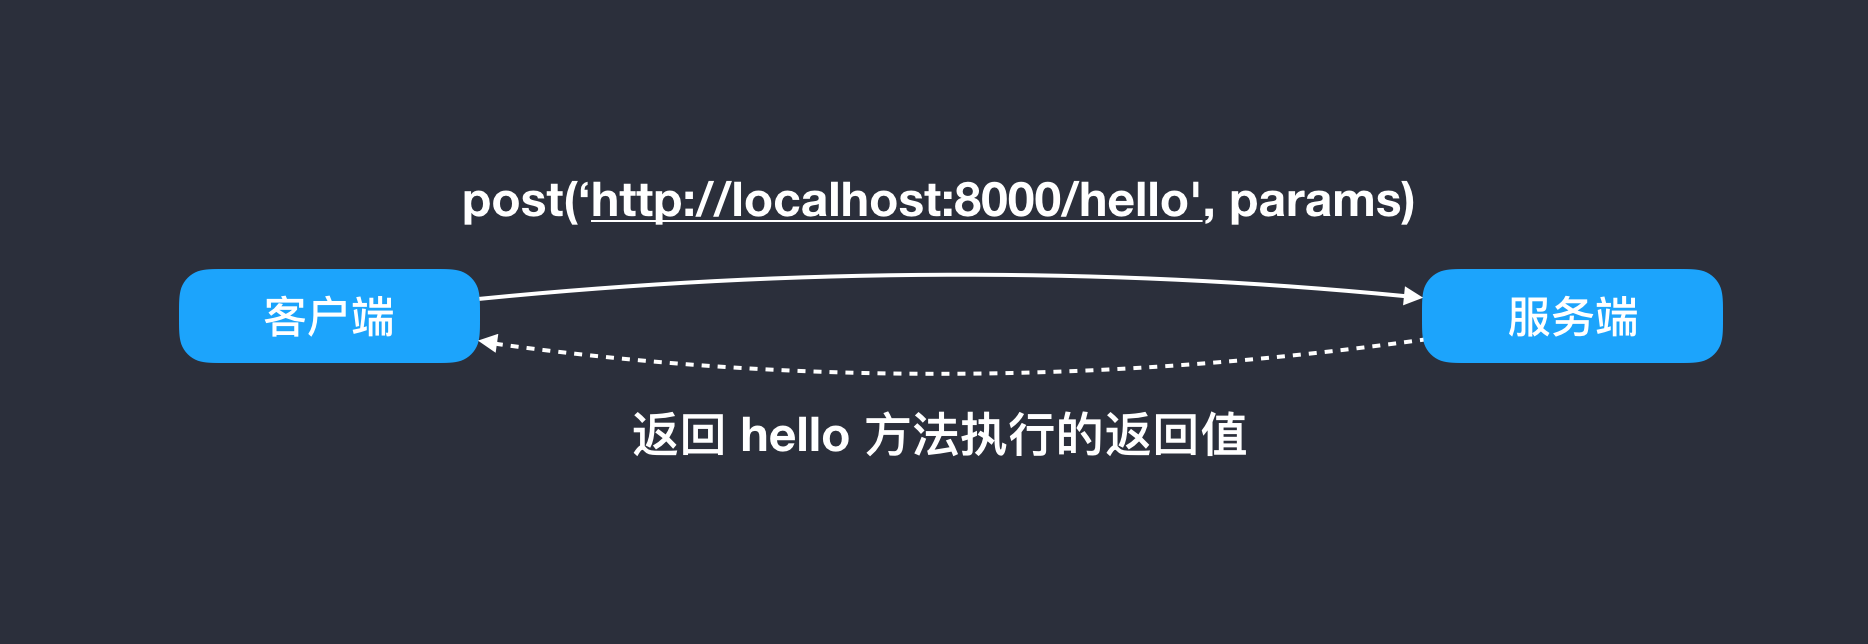
虽然 RMI 底层并不是使用 http 协议,但大致的思路是差不多的。
RMI 的流程:
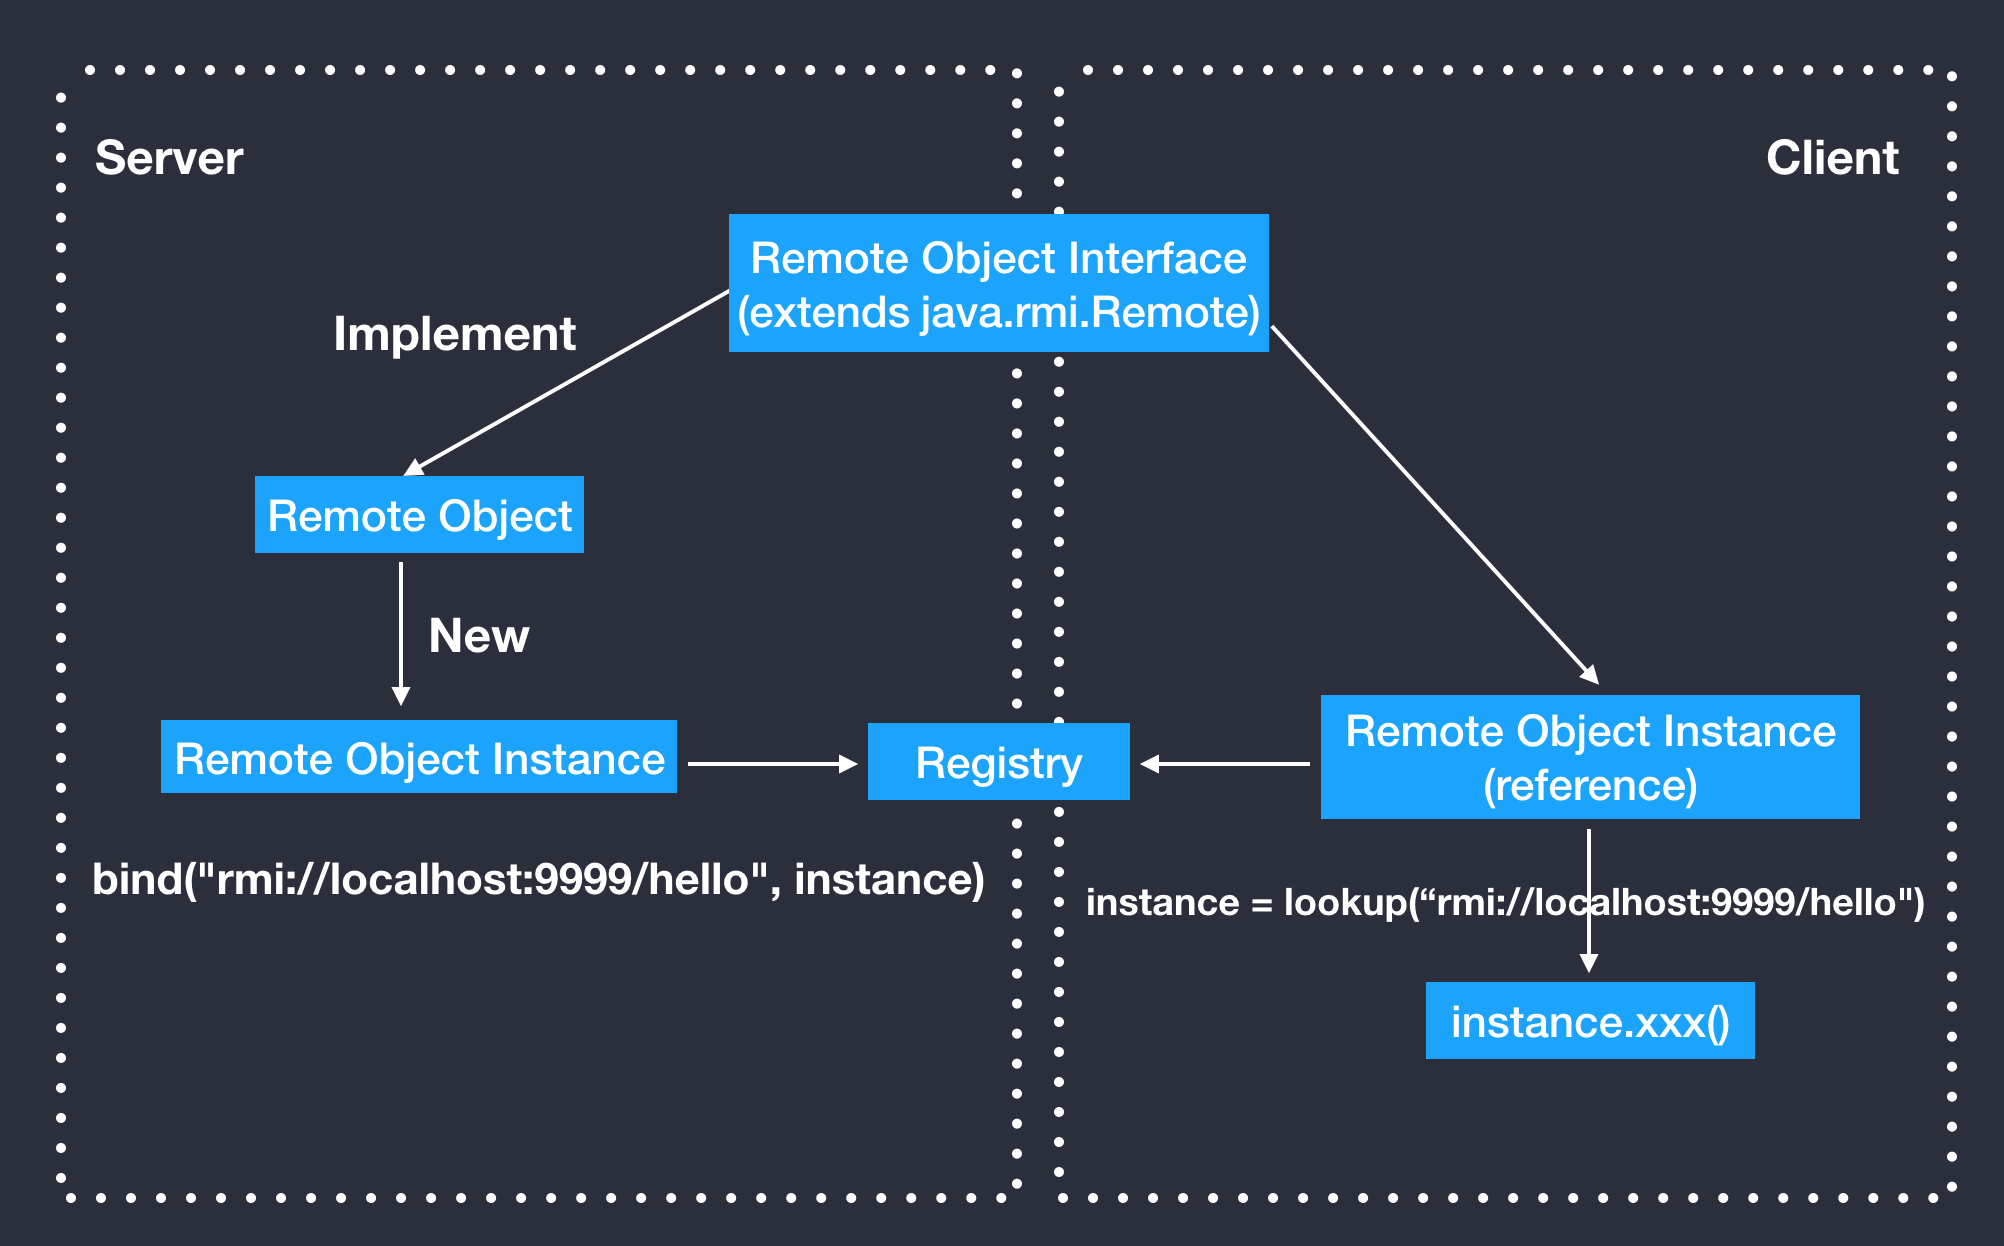
远程对象(Remote Objects)
remote 模块返回的每个对象 (包括函数) 表示主进程中的一个对象 (我们称它为远程对象或远程函数)。当调用远程对象的方法时, 调用远程函数, 或者使用远程构造函数 (函数) 创建新对象时, 实际上是在发送同步进程消息。
在这个示例中, BrowserWindow 和 win 都是远程对象, new BrowserWindow 在渲染过程中没有创建 BrowserWindow 对象。取而代之的是,它在主进程中创建了一个 BrowserWindow 对象,并且在渲染进程中返回相应的远程对象,即 win 对象。
注意:
- 当远程对象被第一次引用时,只有可枚举的属性可以通过远程访问。
- 当通过
remote模块访问时,数组和缓冲区在IPC上复制。 在渲染进程中修改它们不会在主进程中修改它们,反之亦然。
Electron 确保只要渲染进程中的远程对象一直存在(换句话说,没有被回收),主进程中的相应对象就不会被释放。 当远程对象被垃圾回收后,主进程中的相应对象将被解除引用。如果远程对象在渲染进程中泄露(例如存储在映射中,但从未释放),则主进程中的相应对象也将被泄漏,所以您应该非常小心,不要泄漏远程对象,但是,字符串和数字等主要值的类型是通过复制发送的。
我们也可以通过 remote 对象访问到主过程中的内置模块,因此可以像 electron 模块一样直接使用它们:
const app = require("electron").remote.app;
console.log(app);
主进程调用渲染进程的函数
反过来可以使用 webContents.executeJavascript 执行渲染进程中的方法。
mainWindow.webContents
  .executeJavaScript('axios.get("http://www.httpbin.org/get")', true)
  .then(result => {
    console.log(result);
  });
VS Code 依赖注入原理
依赖注入基本概念
控制反转(Inversion of Control, 简称 IoC),将原本在程序中手动创建对象的控制权转移至第三方,例如 IoC 容器,即可由 IoC 容器来管理对象的生命周期、依赖关系等。IoC 主要的实现方式有两种:依赖查找,依赖注入。
依赖注入 (Dependency Injection) 是一种设计模式。在 VSCode 的源码中随处可见,所以这里简单介绍下。首先看依赖注入的定义:
在软件工程中,依赖注入是一种为一类对象提供依赖的对象的设计模式。被依赖的对象称为 Service,注入则是指将被依赖的对象 Service 传递给使用服务的对象(称为 Client),从而客户 Client 不需要主动去建立(new)依赖的服务 Service,也不需要通过工厂模式去获取依赖的服务 Service。
如果在 Class Client 中,有 Class Service 的实例,则称 Class Client 对 Class Service 有一个依赖。例如下面类 Client 中用到一个 Service 对象,我们就说类 Client 对类 Service 有一个依赖。
public class Client {
  Service service;
  public Client() {
    service = new Service();
  }
}
仔细看这段代码我们会发现存在一些问题:
- 如果现在要改变 service 生成方式,如需要用
new Service(String name)初始化 service,需要修改 Client 代码; - 如果想测试不同 Service 对象对 Client 的影响很困难,因为 service 的初始化被写死在了 Client 的构造函数中;
- 如果
new Service()过程非常缓慢,单测时我们希望用已经初始化好的 service 对象 Mock 掉这个过程也很困难。
上面将依赖在构造函数中直接初始化是一种 Hard init 方式,弊端在于两个类不够独立,不方便测试。我们还有另外一种 Init 方式,如下:
public class Client {
  Service service;
  public Client(Service service) {
    this.service = service;
  }
}
上面代码中,我们将 service 对象作为构造函数的一个参数传入。在调用 Client 的构造方法之前外部就已经初始化好了 Service 对象。像这种非自己主动初始化依赖,而通过外部来传入依赖的方式,我们就称为依赖注入。
依赖注入的基本原理是由外部的容器来保存对象之间的依赖关系,同时这些对象的实例化也由容器来实现,这个容器被称为依赖注入容器。实际应用中我们的系统可能存在大量的对象或者服务,对象之间的依赖关系非常复杂,比如 B 依赖 A,则 A 就要先于 B 被实例化,这就要求外部的容器能够分析出这些对象的依赖关系。许多依赖注入框架还支持多种注入方式,比如构造函数注入、属性注入、方法参数注入等。
在典型的依赖注入模式中,存在以下几类角色:
- 被依赖和使用的对象,即
Service - 使用服务的客户对象,即
Client - 客户使用服务的接口定义,即
Interface - 注入器:负责建立服务对象并提供给
Client,通常也负责建立客户对象
JS 实现依赖注入的方式有多种:
- 基于 Injector、Cache 和函数参数名的依赖注入
- AngularJS 中基于双 Injector 的依赖注入
- inversify.js——Javascript 技术栈中的 IoC 容器
- TypeScript 中基于装饰器和反射的依赖注入
- ...
原理与实现
在 VS Code 源码中有大量的服务(Services)分别提供不同模块的 API 以便其他模块调用。在需要依赖该服务的类构造函数中以装饰器(Decorators)修饰参数的形式声明依赖,调用者不需要显式的 new 这个服务,在调用者被创建时,这些依赖的服务也会被自动创建并传递给该调用者,同时不同的服务也可以相互依赖。这可以极大地降低程序耦合性,同时提高可维护性。
Angular、Nest.js、InversifyJS 等框架都使用了依赖注入实现程序的解耦。VS Code 中也实现了一个轻量级的依赖注入模式,VS Code 中主要使用构造函数注入。
首先需要定义一个类并在其构造函数中声明依赖的服务:
export class CodeApplication extends Disposable {
	private static readonly MACHINE_ID_KEY = 'telemetry.machineId';
	private windowsMainService: IWindowsMainService | undefined;

	constructor(
		private readonly mainIpcServer: Server,
		private readonly userEnv: IProcessEnvironment,
		@IInstantiationService private readonly instantiationService: IInstantiationService,
		@ILogService private readonly logService: ILogService,
		@IEnvironmentService private readonly environmentService: IEnvironmentService,
		@ILifecycleService private readonly lifecycleService: ILifecycleService,
		@IConfigurationService private readonly configurationService: IConfigurationService,
		@IStateService private readonly stateService: IStateService,
		@ISignService private readonly signService: ISignService
	) {
		super();
		this.registerListeners();
	}

	...
}
Javascript 里的装饰器目前处在建议征集的第二阶段,但在 TypeScript 中能够被附加到类声明、方法、访问符、属性或参数上。这里的 @IInstantiationService、@ILogService 等都是装饰器(Decorator),属于 TypeScript 中的参数装饰器。
服务的 Decorator 、接口定义及具体实现一般如下:
// 创建装饰器
export const ILogService = createDecorator<ILogService>('logService');
// 接口
export interface ILogService extends IDisposable {
	_serviceBrand: any;
	onDidChangeLogLevel: Event<LogLevel>;

	getLevel(): LogLevel;
	setLevel(level: LogLevel): void;
	trace(message: string, ...args: any[]): void;
	debug(message: string, ...args: any[]): void;
	info(message: string, ...args: any[]): void;
	warn(message: string, ...args: any[]): void;
	error(message: string | Error, ...args: any[]): void;
	critical(message: string | Error, ...args: any[]): void;
}
// 接口具体实现
export class ConsoleLogService extends AbstractLogService implements ILogService {
  _serviceBrand: any;

	constructor(logLevel: LogLevel = DEFAULT_LOG_LEVEL) {
		super();
		this.setLevel(logLevel);
	}

	trace(message: string, ...args: any[]): void {
		if (this.getLevel() <= LogLevel.Trace) {
			console.log('%cTRACE', 'color: #888', message, ...args);
		}
	}

	...

	dispose(): void { }
}
VS Code 中依赖注入的实现主要在 vs/platform/instantiation/common 文件夹下,如下:
├── descriptors.ts           # 服务实例包装类
├── extensions.ts            # 通用服务注册、获取服务
├── graph.ts                 # 基于有向图的依赖分析
├── instantiation.ts         # 服务实例(创建 Decorator、存储服务的依赖)
├── instantiationService.ts  # 容器
└── serviceCollection.ts     # 服务集合
我们在定义服务的 Decorator 时,是通过调用 createDecorator 函数实现的,用于在构造函数中声明依赖关系以方便注入依赖。createDecorator 的主要作用是返回一个装饰器。
Decorator 的作用
// vs/platform/instantiation/common/instantiation.ts

export namespace _util {
  export const serviceIds = new Map<string, ServiceIdentifier<any>>();

  export const DI_TARGET = "$di$target";
  export const DI_DEPENDENCIES = "$di$dependencies";

  export function getServiceDependencies(
    ctor: any
  ): { id: ServiceIdentifier<any>; index: number; optional: boolean }[] {
    return ctor[DI_DEPENDENCIES] || [];
  }
}

export function createDecorator<T>(serviceId: string): ServiceIdentifier<T> {
  // 已经保存过的服务会直接返回其装饰器
  if (_util.serviceIds.has(serviceId)) {
    return _util.serviceIds.get(serviceId)!;
  }
  // 声明装饰器
  const id = <any>function(target: Function, key: string, index: number): any {
    if (arguments.length !== 3) {
      throw new Error(
        "@IServiceName-decorator can only be used to decorate a parameter"
      );
    }
    // 将服务作为依赖保存在为目标类的属性中
    storeServiceDependency(id, target, index, false);
  };

  id.toString = () => serviceId;

  _util.serviceIds.set(serviceId, id);
  return id;
}

function storeServiceDependency(
  id: Function,
  target: Function,
  index: number,
  optional: boolean
): void {
  if (target[_util.DI_TARGET] === target) {
    target[_util.DI_DEPENDENCIES].push({ id, index, optional });
  } else {
    target[_util.DI_DEPENDENCIES] = [{ id, index, optional }];
    target[_util.DI_TARGET] = target;
  }
}
同时调用 storeServiceDependency 函数将传入的服务 ID (唯一的字符串)及索引保存在所装饰类的一个成员 _util.DI_TARGET($di$dependencies) 数组中。
InstantiationService 容器
VS Code 中容器是 InstantiationService,在 src/vs/code/electron-main/main.ts 的 createServices 方法中,通过创建容器并把服务注册到容器中。
const services = new ServiceCollection();
...
services.set(ILogService, logService);
services.set(IConfigurationService, new ConfigurationService(environmentService.settingsResource));
services.set(ILifecycleService, new SyncDescriptor(LifecycleService));
...
new InstantiationService(services, true);
VS Code 提供了服务集合类 ServiceCollection。在 VS Code 中,服务可以自动实例化、也可以手动实例化并注册到容器中。对于有其他依赖的服务(例如 LifecycleService 依赖于 ILogService 和 IStateService)需要用 SyncDescriptor 类封装一下保存在服务集合中。
SyncDescriptor 是一个用于包装需要被容器实例化的服务实例的描述符对象,它保存了服务实例的构造器和静态参数(需要被直接传递给构造函数)。
export class SyncDescriptor<T> {
  readonly ctor: any;
  readonly staticArguments: any[];
  readonly supportsDelayedInstantiation: boolean;

  constructor(
    ctor: new (...args: any[]) => T,
    staticArguments: any[] = [],
    supportsDelayedInstantiation: boolean = false
  ) {
    // 服务的构造器
    this.ctor = ctor;
    // 静态参数
    this.staticArguments = staticArguments;
    // 是否支持延迟实例化
    this.supportsDelayedInstantiation = supportsDelayedInstantiation;
  }
}
InstantiationService 是依赖注入的核心,当服务被注册到容器后,我们需要先手动实例化程序入口,在 VS Code 中即是 CodeApplication,容器(InstantiationService)保存着这些对象的依赖关系,所以 CodeApplication 也需要借助容器来实例化。
// 这里第二和第三个参数是 CodeApplication 构造器的静态参数,需要手动传递进去
instantiationService
  .createInstance(CodeApplication, mainIpcServer, instanceEnvironment)
  .startup();
instantiationService.createInstance 通过 _util.getServiceDependencies 能够自动处理依赖。
同时也可以手动获取服务实例,需要调用 instantiationService.invokeFunction 方法,传入一个回调函数,其参数是一个访问器,当通过访问器获取指定服务时,容器会自动去分析它所依赖的服务并自动实例化后返回。
instantiationService.invokeFunction(accessor => {
  const logService = accessor.get(ILogService);
  const authService = accessor.get(IAuthService);
});
类实例化原理及基于有向图的依赖分析相对较复杂,篇幅有限,暂不做细致分析。
Workbench 启动流程
main.js
我们从 src/main.js 入手看,很显然可以看出来 main.js 负责初始化 Electron 应用。VS Code 源码中 main.js 如下:
// src/main.js
const app = require("electron").app;

app.once("ready", function() {
  if (args["trace"]) {
    const contentTracing = require("electron").contentTracing;
    const traceOptions = {
      categoryFilter: args["trace-category-filter"] || "*",
      traceOptions: args["trace-options"] || "record-until-full,enable-sampling"
    };

    contentTracing.startRecording(traceOptions, () => onReady());
  } else {
    onReady();
  }
});

function onReady() {
  ...
  const startup = nlsConfig => {
    nlsConfig._languagePackSupport = true;
    process.env['VSCODE_NLS_CONFIG'] = JSON.stringify(nlsConfig);
    process.env['VSCODE_NODE_CACHED_DATA_DIR'] = cachedDataDir || '';

    // Load main in AMD
    perf.mark('willLoadMainBundle');
    require('./bootstrap-amd').load('vs/code/electron-main/main', () => {
      perf.mark('didLoadMainBundle');
    });
  };
  ...
}
onReady 中读取了用户语言设置并劫持了默认的 require 为一个修改过的 loader,用它来加载 src/vs/code/electron-main/main 模块,这是 VSCode 真正的入口,负责解析环境变量和初始化主界面以及创建其他模块所依赖「Services」。electron-main 目录是需要使用 Electron 主进程 API 的源代码。
vs/code/electron-main/main.ts
// src/vs/code/electron-main/main
class CodeMain {
  main(): void {
    ...
    // Launch
    this.startup(args);
  }

  // 启动
  private async startup(args: ParsedArgs): Promise<void> {
    const bufferLogService = new BufferLogService();
    // 使用创建的 services 创建「实例服务」
    const [instantiationService, instanceEnvironment] = this.createServices(args, bufferLogService);
    try {
			// Init services
			await instantiationService.invokeFunction(async accessor => {
				const environmentService = accessor.get(IEnvironmentService);
				const configurationService = accessor.get(IConfigurationService);
				const stateService = accessor.get(IStateService);

				try {
					await this.initServices(environmentService, configurationService as ConfigurationService, stateService as StateService);
				} catch (error) {

					// Show a dialog for errors that can be resolved by the user
					this.handleStartupDataDirError(environmentService, error);

					throw error;
				}
			});

			// Startup
			await instantiationService.invokeFunction(async accessor => {
				const environmentService = accessor.get(IEnvironmentService);
				const logService = accessor.get(ILogService);
				const lifecycleService = accessor.get(ILifecycleService);
				const configurationService = accessor.get(IConfigurationService);

				const mainIpcServer = await this.doStartup(logService, environmentService, lifecycleService, instantiationService, true);

				bufferLogService.logger = new SpdLogService('main', environmentService.logsPath, bufferLogService.getLevel());
				once(lifecycleService.onWillShutdown)(() => (configurationService as ConfigurationService).dispose());

				// 实例服务创建 CodeApplication 实例并调用 startup
				return instantiationService.createInstance(CodeApplication, mainIpcServer, instanceEnvironment).startup();
			});
		} catch (error) {
			instantiationService.invokeFunction(this.quit, error);
		}
  }

  // 创建 Services
  private createServices(args: ParsedArgs, bufferLogService: BufferLogService): [IInstantiationService, typeof process.env] {
    const services = new ServiceCollection();

    const environmentService = new EnvironmentService(args, process.execPath);

    const logService = new MultiplexLogService([
      new ConsoleLogMainService(getLogLevel(environmentService)),
      bufferLogService
    ]);
    process.once("exit", () => logService.dispose());

    // environmentService 一些基本配置,包括运行目录、用户数据目录、工作区缓存目录等
    services.set(IEnvironmentService, environmentService);
    // logService 日志服务
    services.set(ILogService, logService);
    // LifecycleService 生命周期相关的一些方法
    services.set(ILifecycleService, new SyncDescriptor(LifecycleService));
    // StateService 持久化数据
    services.set(IStateService, new SyncDescriptor(StateService));
    // ConfigurationService 配置项
    services.set(
      IConfigurationService,
      new SyncDescriptor(ConfigurationService, [
        environmentService.appSettingsPath
      ])
    );
    // RequestService 请求服务
    services.set(IRequestService, new SyncDescriptor(RequestService));
    // DiagnosticsService 诊断服务,包括程序运行性能分析及系统状态
    services.set(IDiagnosticsService, new SyncDescriptor(DiagnosticsService));

    return new InstantiationService(services, true);
  }
}

// Main Startup
const code = new CodeMain();
code.main();
Services(服务) 是 VSCode 中一系列可以被注入的公共模块,这些 Services 分别负责不同的功能,通过 createServices 创建了几个基本服务,除了这些基本服务,VSCode 内还包含了大量的服务,如 IModeService、ICodeEditorService、IPanelService 等,通过 VSCode 实现的「依赖注入」模式,可以在需要用到这些服务的地方以 Decorator 的方式做为构造函数参数声明依赖,会被自动注入到类中。基础服务初始化完成后会加载 IPC 信道并创建 CodeApplication 实例,调用 startup 方法启动 code。
vs/code/electron-main/app.ts
// vs/code/electron-main/app.ts
export class CodeApplication extends Disposable {
  async startup(): Promise<void> {
    ...
    // Create Electron IPC Server
    const electronIpcServer = new ElectronIPCServer();

    // Spawn shared process after the first window has opened and 3s have passed
    const sharedProcess = this.instantiationService.createInstance(SharedProcess, machineId, this.userEnv);
    const sharedProcessClient = sharedProcess.whenReady().then(() => connect(this.environmentService.sharedIPCHandle, 'main'));
    this.lifecycleService.when(LifecycleMainPhase.AfterWindowOpen).then(() => {
      this._register(new RunOnceScheduler(async () => {
        const userEnv = await getShellEnvironment(this.logService, this.environmentService);

        sharedProcess.spawn(userEnv);
      }, 3000)).schedule();
    });

    // Services
    const appInstantiationService = await this.createServices(machineId, sharedProcess, sharedProcessClient);

    // Setup Auth Handler
    const authHandler = appInstantiationService.createInstance(ProxyAuthHandler);
    this._register(authHandler);

    // Open Windows
    const windows = appInstantiationService.invokeFunction(accessor => this.openFirstWindow(accessor, electronIpcServer, sharedProcessClient));

    // Post Open Windows Tasks
    this.afterWindowOpen();
  }

  private openFirstWindow(accessor: ServicesAccessor, electronIpcServer: ElectronIPCServer, sharedProcessClient: Promise<Client<string>>): ICodeWindow[] {
    // Register more Main IPC services
    const launchService = accessor.get(ILaunchService);
    const launchChannel = new LaunchChannel(launchService);
    this.mainIpcServer.registerChannel('launch', launchChannel);

    // Register more Electron IPC services
    const updateService = accessor.get(IUpdateService);
    const updateChannel = new UpdateChannel(updateService);
    electronIpcServer.registerChannel('update', updateChannel);

    const issueService = accessor.get(IIssueService);
    const issueChannel = new IssueChannel(issueService);
    electronIpcServer.registerChannel('issue', issueChannel);

    const workspacesService = accessor.get(IWorkspacesMainService);
    const workspacesChannel = new WorkspacesChannel(workspacesService);
    electronIpcServer.registerChannel('workspaces', workspacesChannel);

    const windowsService = accessor.get(IWindowsService);
    const windowsChannel = new WindowsChannel(windowsService);
    electronIpcServer.registerChannel('windows', windowsChannel);
    sharedProcessClient.then(client => client.registerChannel('windows', windowsChannel));

    const menubarService = accessor.get(IMenubarService);
    const menubarChannel = new MenubarChannel(menubarService);
    electronIpcServer.registerChannel('menubar', menubarChannel);

    const urlService = accessor.get(IURLService);
    const urlChannel = new URLServiceChannel(urlService);
    electronIpcServer.registerChannel('url', urlChannel);

    const storageMainService = accessor.get(IStorageMainService);
    const storageChannel = this._register(new GlobalStorageDatabaseChannel(this.logService, storageMainService as StorageMainService));
    electronIpcServer.registerChannel('storage', storageChannel);

    // Log level management
    const logLevelChannel = new LogLevelSetterChannel(accessor.get(ILogService));
    electronIpcServer.registerChannel('loglevel', logLevelChannel);
    sharedProcessClient.then(client => client.registerChannel('loglevel', logLevelChannel));

    // Signal phase: ready (services set)
		this.lifecycleService.phase = LifecycleMainPhase.Ready;

		// Propagate to clients
		const windowsMainService = this.windowsMainService = accessor.get(IWindowsMainService);
    ...
  }
}
CodeApplication.startup 中首先会启动 SharedProcess 共享进程,同时也创建了一些窗口相关的服务,包括 WindowsManager、WindowsService、MenubarService 等,负责窗口、多窗口管理及菜单等功能。
CodeApplication.openFirstWindow 负责处理首次开启窗口,这里会先创建一系列 Electron 的 IPC 频道,用于主进程和渲染进程间通信。其中 window 和 logLevel 频道还会被注册到 sharedProcessClient,sharedProcessClient 是主进程与共享进程(SharedProcess)进行通信的 client。CodeApplication.openFirstWindow 最终会根据 environmentService 提供的相关参数(file_uri、folder_uri)调用windowsMainService.open 方法打开窗口。
vs/code/electron-main/windows.ts
到这里还没有看到入口 HTML,我们继续看看 src/vs/code/electron-main/windows.ts:
open(openConfig: IOpenConfiguration): ICodeWindow[] {
  ...
  // Open based on config
	const usedWindows = this.doOpen(openConfig, workspacesToOpen, foldersToOpen, emptyToRestore, emptyToOpen, fileInputs, foldersToAdd);
  ...
}
open 方法里面最终调用 doOpen,doOpen 方法最终调用 openInBrowserWindow 方法:
// Create the window
window = this.instantiationService.createInstance(CodeWindow, {
  state,
  extensionDevelopmentPath: configuration.extensionDevelopmentPath,
  isExtensionTestHost: !!configuration.extensionTestsPath
});
关键的 CodeWindow 定义在 src/vs/code/electron-main/window.ts,初始化过程是多窗体管理类(windows.ts)调用 VS Code 主窗体(window.ts),所以 open() 最终返回了一个 CodeWindow 实例。
CodeWindow 中的 load() 负责加载 URL:
public load(config: IWindowConfiguration, isReload?: boolean): void {
  ...
  // Load URL
  mark('main:loadWindow');
  this._win.loadURL(this.getUrl(config));
  ...
}

private doGetUrl(config: object): string {
  return `${require.toUrl('vs/code/electron-browser/workbench/workbench.html')}?config=${encodeURIComponent(JSON.stringify(config))}`;
}
HTML 出现了,VS Code 中 Electron 的 main process 流程我们顺便跟进完成。
workbench.html:
<!DOCTYPE html>
<html>
  <head>
    <meta charset="utf-8" />
    <meta
      http-equiv="Content-Security-Policy"
      content="default-src 'none'; img-src 'self' https: data: blob: vscode-remote:; media-src 'none'; child-src 'self'; object-src 'self'; script-src 'self'; style-src 'self' 'unsafe-inline'; connect-src 'self' https:; font-src 'self' https: vscode-remote:;"
    />
  </head>
  <body class="vs-dark" aria-label=""></body>

  <!-- Startup via workbench.js -->
  <script src="workbench.js"></script>
</html>
workbench.js:
bootstrapWindow.load(
  [
    "vs/workbench/workbench.main",
    "vs/nls!vs/workbench/workbench.main",
    "vs/css!vs/workbench/workbench.main"
  ],
  function(workbench, configuration) {
    perf.mark("didLoadWorkbenchMain");

    return process["lazyEnv"].then(function() {
      perf.mark("main/startup");

      // @ts-ignore
      return require("vs/workbench/electron-browser/main").main(configuration);
    });
  },
  {
    removeDeveloperKeybindingsAfterLoad: true,
    canModifyDOM: function(windowConfig) {
      showPartsSplash(windowConfig);
    },
    beforeLoaderConfig: function(windowConfig, loaderConfig) {
      loaderConfig.recordStats = true;
    },
    beforeRequire: function() {
      perf.mark("willLoadWorkbenchMain");
    }
  }
);
加载 vs/workbench/electron-browser/main,并调用 main()。
vs/workbench/electron-browser/main.ts
前文中的大量代码只是为这里最终创建主界面做铺垫,Workbench 模块主要代码都在 vs/workbench 目录下,主要负责界面元素的创建和具体业务功能的实现。
// vs/workbench/electron-browser/main.ts
class CodeRendererMain extends Disposable {
  ...
  async open(): Promise<void> {
    // 创建依赖的服务
    const services = await this.initServices();
    // 监听 DOMContentLoaded 事件
    await domContentLoaded();
    mark('willStartWorkbench');

    // 创建 Workbench 实例
    this.workbench = new Workbench(document.body, services.serviceCollection, services.logService);

    // Layout
    this._register(addDisposableListener(window, EventType.RESIZE, e => this.onWindowResize(e, true)));

    // Workbench Lifecycle
    this._register(this.workbench.onShutdown(() => this.dispose()));
    this._register(this.workbench.onWillShutdown(event => event.join(services.storageService.close())));

    // Startup
    const instantiationService = this.workbench.startup();

    // Window
    this._register(instantiationService.createInstance(ElectronWindow));

    // Driver
    if (this.configuration.driver) {
      instantiationService.invokeFunction(async accessor => this._register(await registerWindowDriver(accessor)));
    }

    // Config Exporter
    if (this.configuration['export-default-configuration']) {
      instantiationService.createInstance(DefaultConfigurationExportHelper);
    }

    // Logging
    services.logService.trace('workbench configuration', JSON.stringify(this.configuration));
  }
}

export function main(configuration: IWindowConfiguration): Promise<void> {
  const renderer = new CodeRendererMain(configuration);
  return renderer.open();
}
创建 Workbench 实例并调用 workbench.startup 开始构建主界面布局 Workbench。
vs/workbench/browser/workbench.ts
支持我们才跟踪到 Workbench 的代码,Workbench 类继承自 Layout 类,是主界面布局的入口文件,实际布局操作会调用 Layout 抽象类的方法。
// vs/workbench/browser/workbench.ts
export class Workbench extends Layout {
  ...
  startup(): IInstantiationService {
    try {

      // Configure emitter leak warning threshold
      setGlobalLeakWarningThreshold(175);

      // Setup Intl for comparers
      setFileNameComparer(new IdleValue(() => {
        const collator = new Intl.Collator(undefined, { numeric: true, sensitivity: 'base' });
        return {
          collator: collator,
          collatorIsNumeric: collator.resolvedOptions().numeric
        };
      }));

      // ARIA
      setARIAContainer(document.body);

      // Services(实例化依赖的服务)
      const instantiationService = this.initServices(this.serviceCollection);

      instantiationService.invokeFunction(async accessor => {
        const lifecycleService = accessor.get(ILifecycleService);
        const storageService = accessor.get(IStorageService);
        const configurationService = accessor.get(IConfigurationService);

        // Layout(布局初始化:Services、Parts、Listeners、State)
        this.initLayout(accessor);

        // Registries
        this.startRegistries(accessor);

        // Context Keys
        this._register(instantiationService.createInstance(WorkbenchContextKeysHandler));

        // Register Listeners(创建全局事件监听)
        this.registerListeners(lifecycleService, storageService, configurationService);

        // Render Workbench(渲染工作区)
        this.renderWorkbench(instantiationService, accessor.get(INotificationService) as NotificationService, storageService, configurationService);

        // Workbench Layout
        this.createWorkbenchLayout(instantiationService);

        // Layout(计算布局)
        this.layout();

        // Restore
        try {
          await this.restoreWorkbench(accessor.get(IEditorService), accessor.get(IEditorGroupsService), accessor.get(IViewletService), accessor.get(IPanelService), accessor.get(ILogService), lifecycleService);
        } catch (error) {
          onUnexpectedError(error);
        }
      });

      return instantiationService;
    } catch (error) {
      onUnexpectedError(error);

      throw error; // rethrow because this is a critical issue we cannot handle properly here
    }
  }
  ...
}
Layout 类:
// vs/workbench/browser/layout.ts
export abstract class Layout extends Disposable
  implements IWorkbenchLayoutService {
  protected readonly state = {};
  protected initLayout(accessor: ServicesAccessor): void {}
  private registerLayoutListeners(): void {}
  private onMenubarToggled(visible: boolean) {}
  private onFullscreenChanged(): void {}
  private doUpdateLayoutConfiguration(skipLayout?: boolean): void {}
  private setSideBarPosition(position: Position): void {}
  private initLayoutState(
    lifecycleService: ILifecycleService,
    fileService: IFileService
  ): void {}
  private resolveEditorsToOpen(
    fileService: IFileService
  ): Promise<IResourceEditor[]> | IResourceEditor[] {}
  private hasInitialFilesToOpen(): boolean {}
  private updatePanelPosition() {}
  registerPart(part: Part): void {}
  protected getPart(key: Parts): Part {}
  isRestored(): boolean {}
  hasFocus(part: Parts): boolean {}
  getContainer(part: Parts): HTMLElement {}
  isVisible(part: Parts): boolean {}
  getTitleBarOffset(): number {}
  getWorkbenchElement(): HTMLElement {}
  toggleZenMode(skipLayout?: boolean, restoring = false): void {}
  private setStatusBarHidden(hidden: boolean, skipLayout?: boolean): void {}
  private setIconExploration(enabled: boolean): void {}
  protected createWorkbenchLayout(
    instantiationService: IInstantiationService
  ): void {}
  layout(options?: ILayoutOptions): void {}
  private layoutGrid(): void {}
  private getPanelDimension(position: Position): number {}
  isEditorLayoutCentered(): boolean {}
  centerEditorLayout(active: boolean, skipLayout?: boolean): void {}
  resizePart(part: Parts, sizeChange: number): void {}
  setActivityBarHidden(hidden: boolean, skipLayout?: boolean): void {}
  setEditorHidden(hidden: boolean, skipLayout?: boolean): void {}
  setSideBarHidden(hidden: boolean, skipLayout?: boolean): void {}
  setPanelHidden(hidden: boolean, skipLayout?: boolean): void {}
  toggleMaximizedPanel(): void {}
  isPanelMaximized(): boolean {}
  getSideBarPosition(): Position {}
  setMenubarVisibility(
    visibility: MenuBarVisibility,
    skipLayout: boolean
  ): void {}
  getMenubarVisibility(): MenuBarVisibility {}
  getPanelPosition(): Position {}
  setPanelPosition(position: Position): void {}
  private savePanelDimension(): void {}
  private saveLayoutState(e: IWillSaveStateEvent): void {}
  dispose(): void {}
}
至此我们已经找到 Workbench 的关键代码,对于我们拓展主界面(Workbench)的视图,关键在于 Workbench 类的 renderWorkbench 方法,Layout 类的 initLayout() 方法、createWorkbenchLayout() 方法、layout() 方法。
拓展 Workbench
下图是 TaobaoEditor 的整体开发界面:
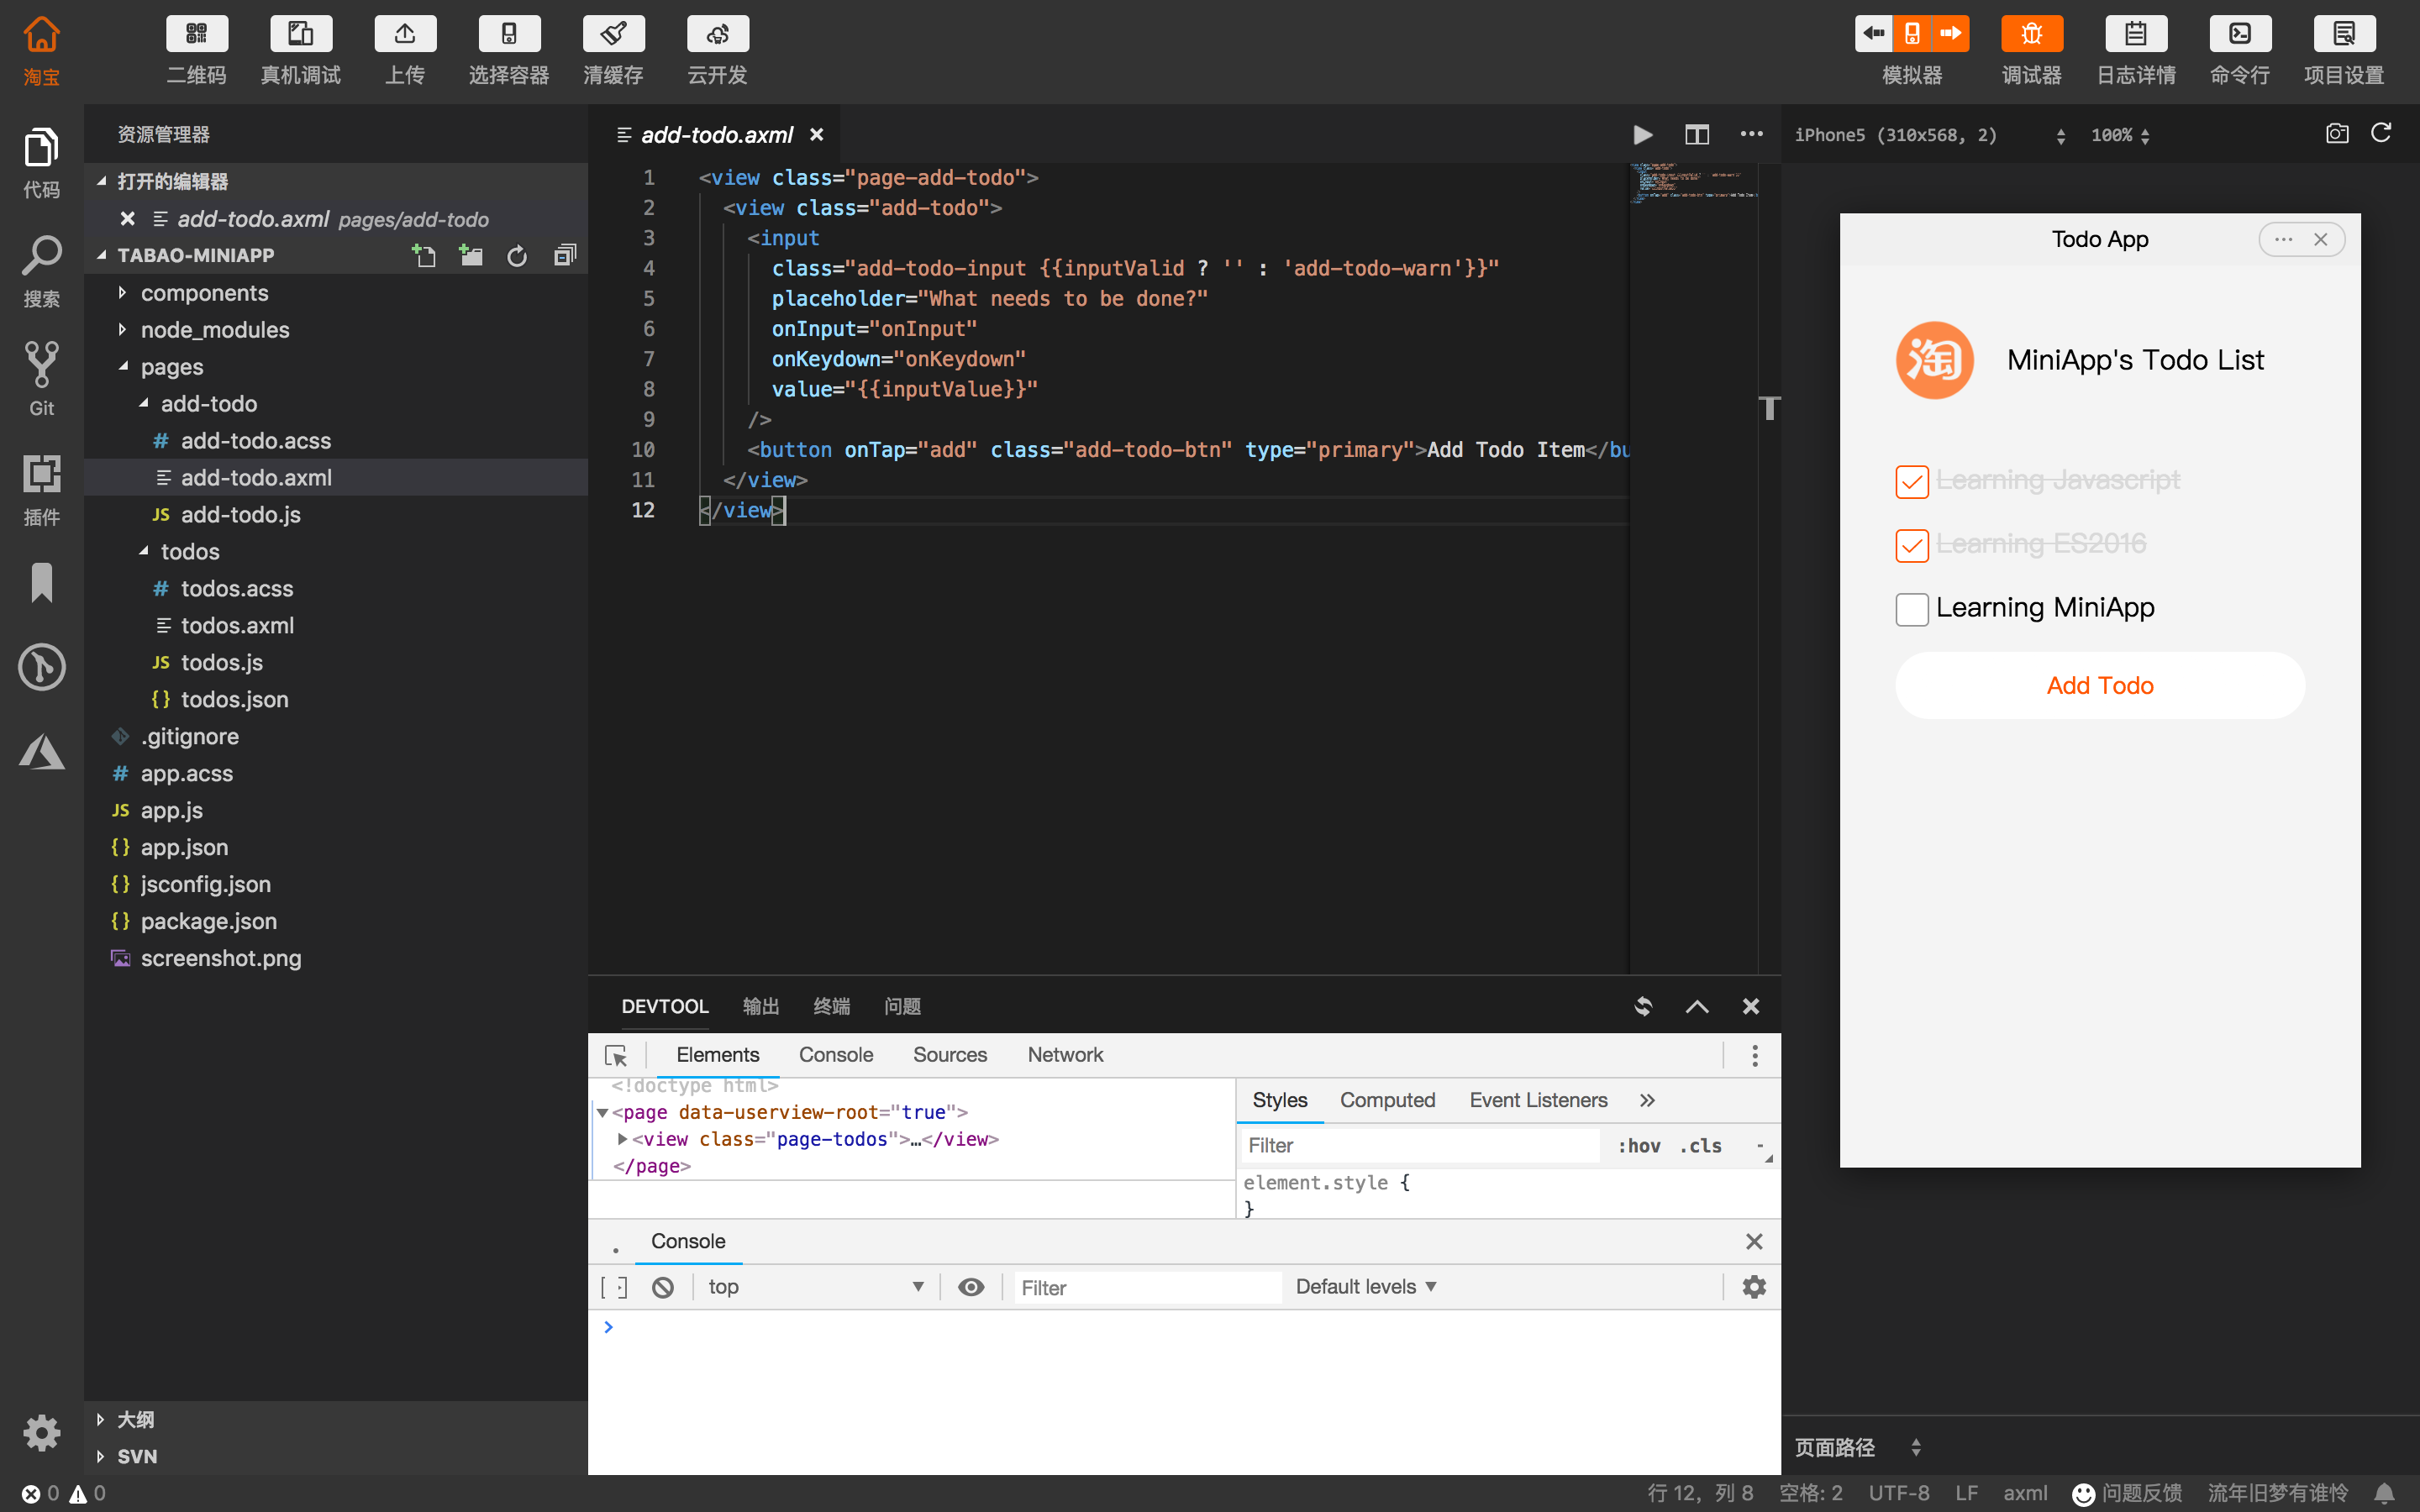
之前的文章中我们了解到 Workbench 主要分为以下几个部分:
- 标题栏: Title Bar
- 活动栏: Activity Bar
- 侧边栏: Side Bar
- 面板: Panal
- 编辑器群: Editor
- 状态栏: Status Bar
VSC 的 UI 是由一个个 Part 组成的,每个 Part 由 Workbanch 统一管理,由 WorkbanchLayout 负责布局。每个 Part 功能独立,改变布局并不会对功能产生影响,添加新的 Part 可以添加新的功能比如右边栏和工具栏。
很明显最上面的 Header Bar 和 Simulator 不是 VS Code 实现的,这个也没有办法直接通过插件拓展的方式去实现。那么像 Header Bar 和 Simulator 这样的 UI 是怎么实现的呢?我们通过实现如下的例子 Header Bar 来进行说明。
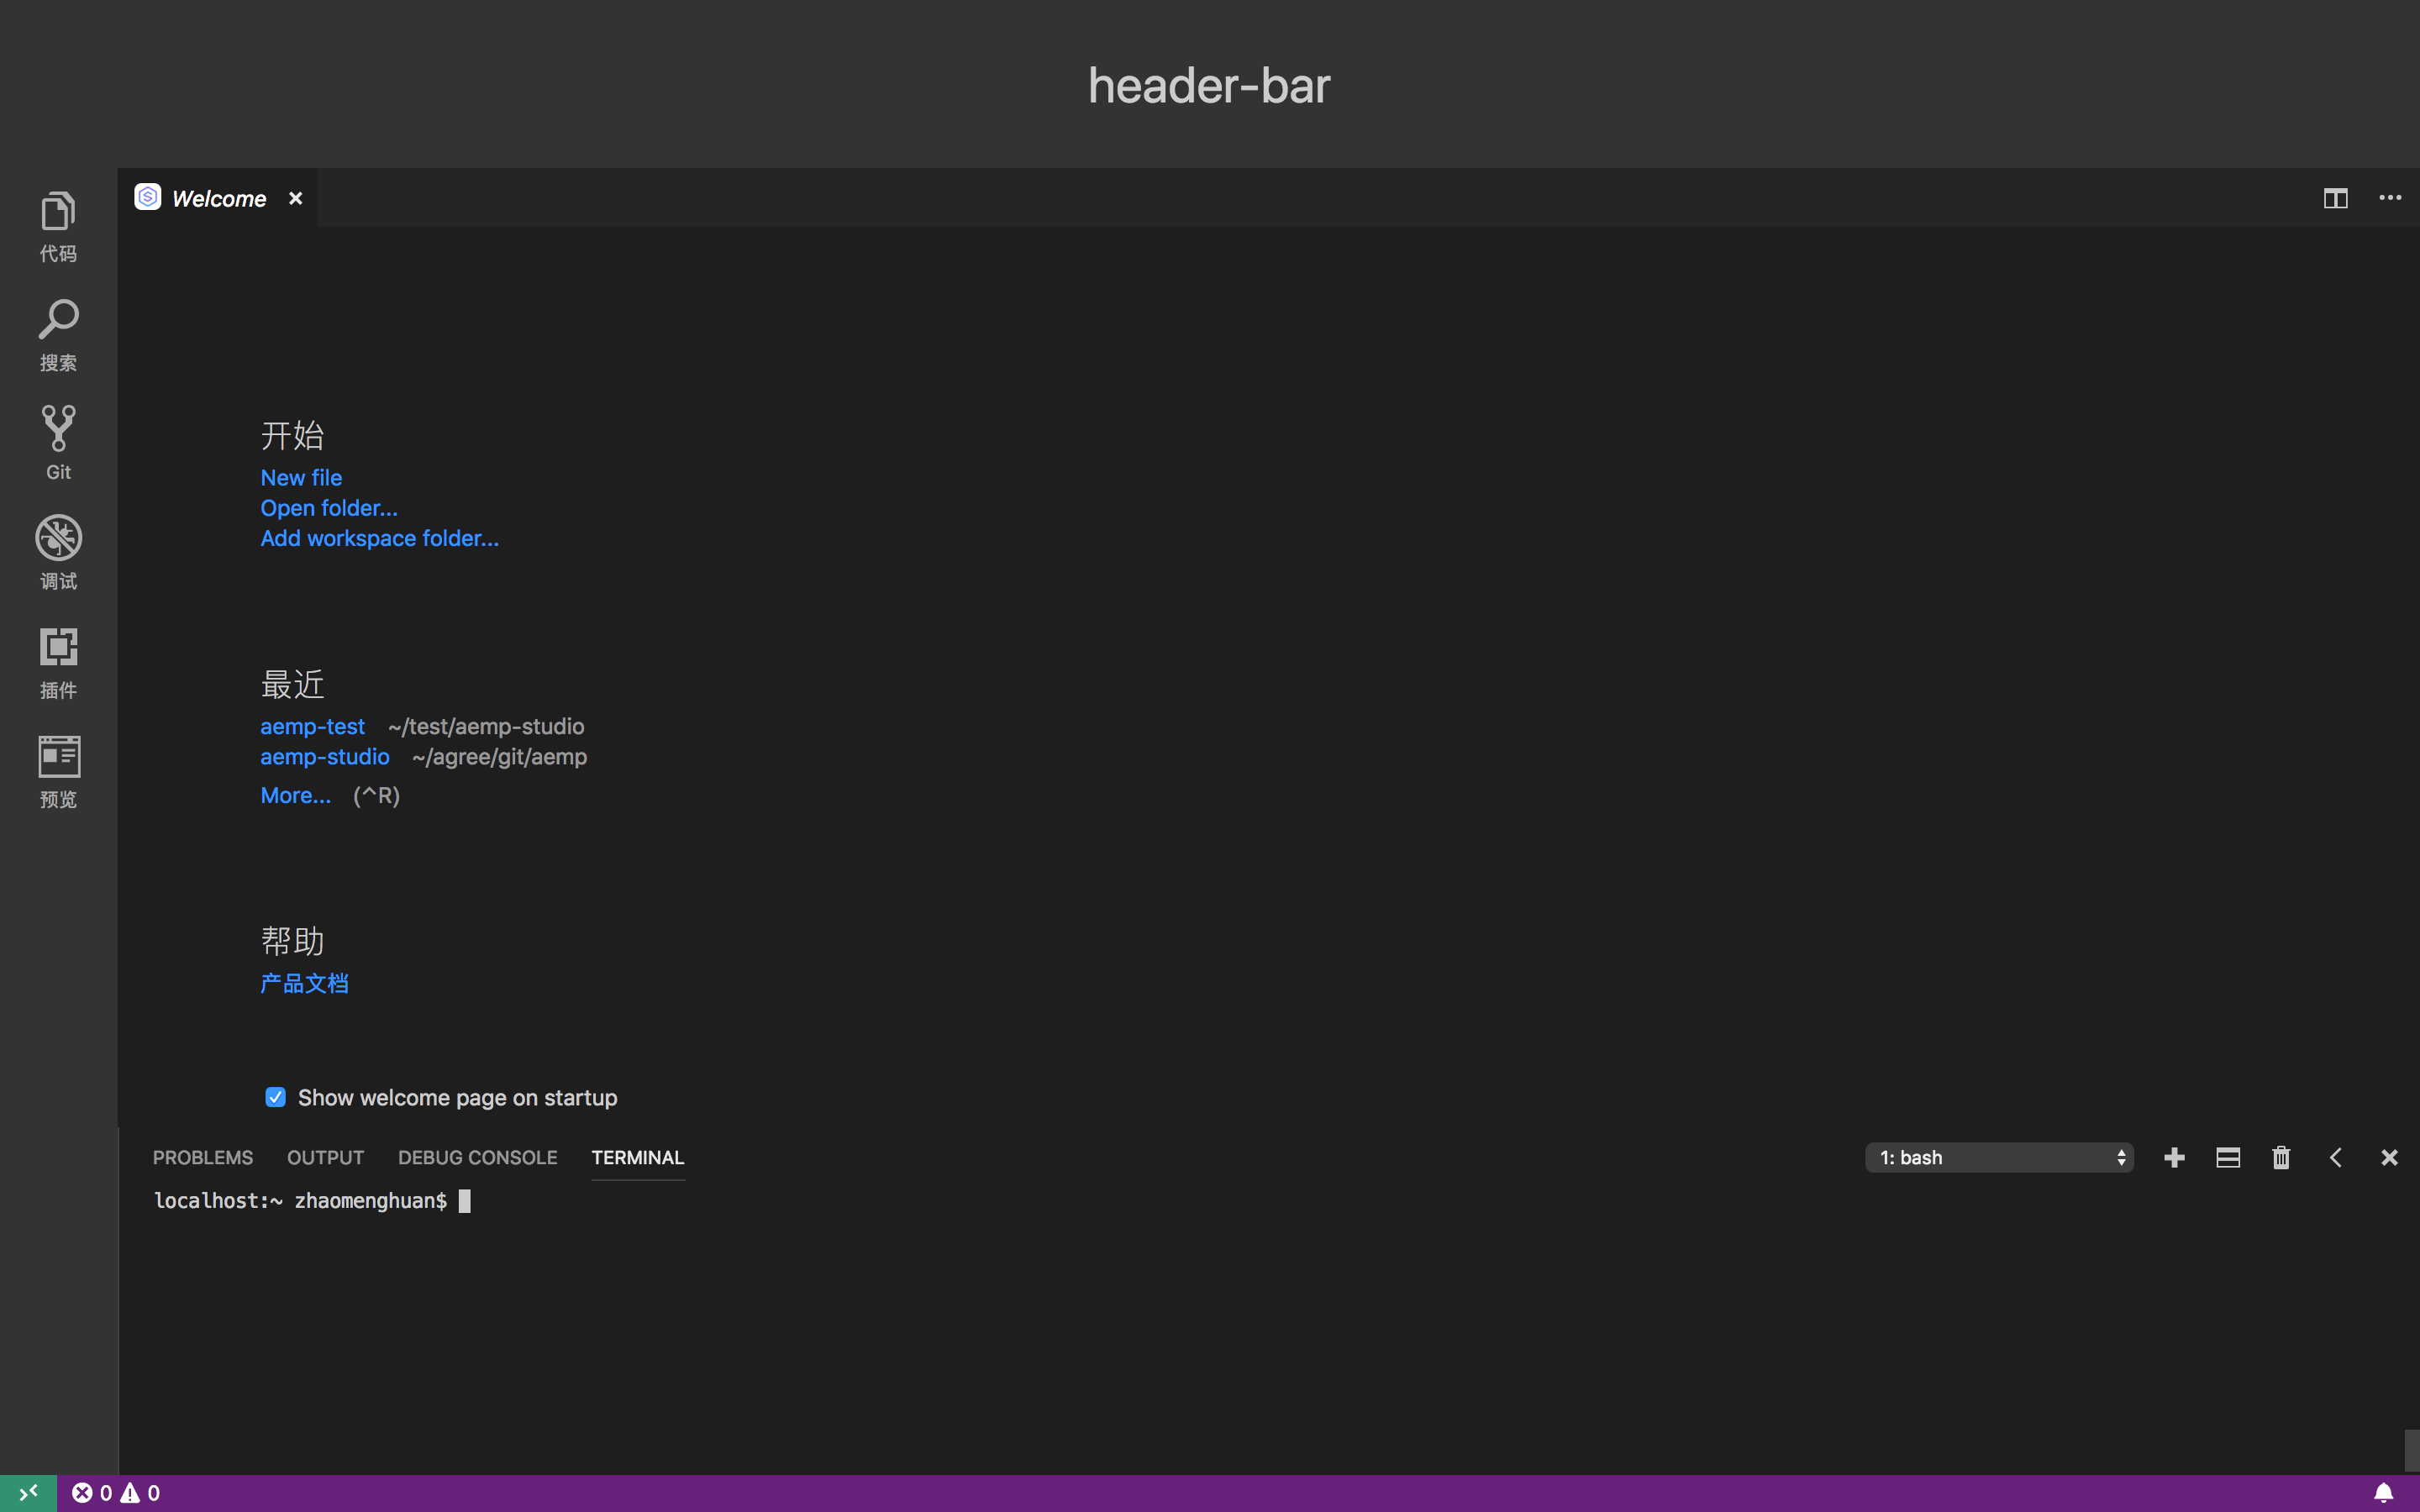
src/vs/workbench 的目录结构:
├── api
├── browser
│   ├── actions
│   ├── media
│   ├── parts
│   │   ├── activitybar
│   │   ├── editor
│   │   ├── panel
│   │   ├── statusbar
│   │   ├── ...
│   ├── actions.ts
│   ├── ...
│   ├── layout.ts
│   ├── legacyLayout.ts
│   ├── part.ts
│   └── workbench.ts
├── common
├── contrib
├── electron-browser
├── services
├── test
├── buildfile.js
├── workbench.main.css
├── workbench.main.nls.js
├── workbench.main.ts
├── workbench.web.main.css
├── workbench.web.main.nls.js
└── workbench.web.main.ts
继承 Part 类
这里我在 src/vs/workbench/browser/parts 增加一个文件夹 headerbar:
├── media
│   ├── headerbarpart.css
└── headerbarPart.ts
src/vs/workbench/browser/parts/headerbar/headerbarPart.ts 如下:
import "vs/css!./media/Headerbarpart";
import { Part } from "vs/workbench/browser/part";
import { addClass } from "vs/base/browser/dom";
import {
  IInstantiationService,
  ServiceIdentifier
} from "vs/platform/instantiation/common/instantiation";
import {
  Parts,
  IWorkbenchLayoutService
} from "vs/workbench/services/layout/browser/layoutService";
import { IStorageService } from "vs/platform/storage/common/storage";
import { IThemeService } from "vs/platform/theme/common/themeService";
import { IHeaderBarService } from "vs/workbench/services/headerBar/browser/headerBarService";
import { registerSingleton } from "vs/platform/instantiation/common/extensions";
import { ACTIVITY_BAR_BACKGROUND } from "vs/workbench/common/theme";

export class HeaderbarPart extends Part implements IHeaderBarService {
  _serviceBrand: ServiceIdentifier<any>;

  minimumWidth: number = 0;
  maximumWidth: number;
  minimumHeight: number = 100;
  maximumHeight: number = 100;

  constructor(
    @IStorageService storageService: IStorageService,
    @IThemeService themeService: IThemeService,
    @IWorkbenchLayoutService layoutService: IWorkbenchLayoutService,
    @IInstantiationService instantiationService: IInstantiationService
  ) {
    super(
      Parts.HEADERBAR_PART,
      { hasTitle: false },
      themeService,
      storageService,
      layoutService
    );
  }

  createContentArea(parent: HTMLElement): HTMLElement {
    this.element = parent;

    const content = document.createElement("div");
    addClass(content, "header-wrapper");
    parent.appendChild(content);
    content.innerHTML = "header-bar";

    return content;
  }

  updateStyles(): void {
    super.updateStyles();

    const container = this.getContainer();
    container.style.backgroundColor = this.getColor(ACTIVITY_BAR_BACKGROUND);
  }

  layout(width: number, height: number): void {
    super.layoutContents(width, height);
  }

  toJSON(): object {
    return {
      type: Parts.HEADERBAR_PART
    };
  }
}

registerSingleton(IHeaderBarService, HeaderbarPart);src/vs/workbench/services/headerBar/browser/headerBarService.ts:
import { createDecorator } from "vs/platform/instantiation/common/instantiation";

export const IHeaderBarService = createDecorator<IHeaderBarService>(
  "headerBarService"
);

export interface IHeaderBarService {
  _serviceBrand: any;
}
我们的服务需要在 workbench.main.ts 和 workbench.web.main.ts 进行注册才能被 workbench.initServices 自动收集作为通用服务注入到容器内,被 Layout.initLayout 方法初始化。
//#region --- workbench parts
...
import 'vs/workbench/browser/parts/headerbar/headerbarPart';
...
//#endregion
修改 Workbench 与 Layout
src/vs/workbench/services/layout/browser/layoutService.ts:
export const enum Parts {
  TITLEBAR_PART = "workbench.parts.titlebar",
  HEADERBAR_PART = "workbench.parts.headerbar",
  ACTIVITYBAR_PART = "workbench.parts.activitybar",
  SIDEBAR_PART = "workbench.parts.sidebar",
  PANEL_PART = "workbench.parts.panel",
  EDITOR_PART = "workbench.parts.editor",
  STATUSBAR_PART = "workbench.parts.statusbar"
}src/vs/workbench/browser/workbench.ts#renderWorkbench:
[
  { id: Parts.TITLEBAR_PART, role: "contentinfo", classes: ["titlebar"] },
  { id: Parts.HEADERBAR_PART, role: "complementary", classes: ["headerbar"] },
  {
    id: Parts.ACTIVITYBAR_PART,
    role: "navigation",
    classes: [
      "activitybar",
      this.state.sideBar.position === Position.LEFT ? "left" : "right"
    ]
  },
  {
    id: Parts.SIDEBAR_PART,
    role: "complementary",
    classes: [
      "sidebar",
      this.state.sideBar.position === Position.LEFT ? "left" : "right"
    ]
  },
  {
    id: Parts.EDITOR_PART,
    role: "main",
    classes: ["editor"],
    options: { restorePreviousState: this.state.editor.restoreEditors }
  },
  {
    id: Parts.PANEL_PART,
    role: "complementary",
    classes: [
      "panel",
      this.state.panel.position === Position.BOTTOM ? "bottom" : "right"
    ]
  },
  { id: Parts.STATUSBAR_PART, role: "contentinfo", classes: ["statusbar"] }
].forEach(({ id, role, classes, options }) => {
  const partContainer = this.createPart(id, role, classes);

  if (!configurationService.getValue("workbench.useExperimentalGridLayout")) {
    // TODO@Ben cleanup once moved to grid
    // Insert all workbench parts at the beginning. Issue #52531
    // This is primarily for the title bar to allow overriding -webkit-app-region
    this.container.insertBefore(partContainer, this.container.lastChild);
  }

  this.getPart(id).create(partContainer, options);
});src/vs/workbench/browser/layout.ts:
protected initLayout(accessor: ServicesAccessor): void {
  ...
  // Parts
  accessor.get(IActivityBarService); // not used, but called to ensure instantiated
	accessor.get(IHeaderBarService);
}

getContainer(part: Parts): HTMLElement {
  switch (part) {
    case Parts.HEADERBAR_PART:
      return this.getPart(Parts.HEADERBAR_PART).getContainer();
    ...
  }
}

protected createWorkbenchLayout(instantiationService: IInstantiationService): void {
  const headerBar = this.getPart(Parts.HEADERBAR_PART);
  ...
  if (this.configurationService.getValue('workbench.useExperimentalGridLayout')) {
    // Create view wrappers for all parts
    this.headerBarPartView = new View(headerBar);
    ...
  } else {
    this.workbenchGrid = instantiationService.createInstance(
      WorkbenchLegacyLayout,
      this.parent,
      this.container,
      {
        titlebar: titleBar,
        activitybar: activityBar,
        editor: editorPart,
        sidebar: sideBar,
        panel: panelPart,
        statusbar: statusBar,
        headerbar: headerBar
      }
    );
  }
}

private layoutGrid(): void {
  ...
  let headerBarInGrid = this.workbenchGrid.hasView(this.headerBarPartView);
  let panelInGrid = this.workbenchGrid.hasView(this.panelPartView);
  ...
  // Add parts to grid
  if (!headerBarInGrid) {
    this.workbenchGrid.addView(this.headerBarPartView, Sizing.Split, this.titleBarPartView, Direction.Down);
    headerBarInGrid = true;
  }
  ...
  if (!this.state.headerBar.hidden) {
    this.headerBarPartView.show();
  }
}
workbench 有两种布局模式:网格布局(Grid)和精确像素布局(WorkbenchLegacyLayout)。网格布局需要开启 settings 里面的workbench.useExperimentalGridLayout,设置为 true 生效;精确像素布局统一用绝对布局 + 计算的方式。VS Code 默认采用精确像素布局,主要逻辑在src/vs/workbench/browser/legacyLayout.ts 中。上面为了新增 headerbar,我们主要需要调整 activitybarContainer、sidebarContainer、editorContainer 的位置,修改 top 参数 this.titlebarHeight 为 this.titlebarHeight + this.headerbarHeight。
后记
VS Code 整体架构非常复杂,但同时源码非常清晰明了,也极少有第三方依赖,核心模块大都是由自身实现,包括编辑器(Monaco)、依赖注入系统、模块加载(拦截加载器)、插件系统、语言服务、调试器前端及调试器协议等。本文重点围绕 Workbench 创建流程入手粗略的跟踪源码过程,对 Electron 进程模型及 VS Code 依赖注入系统的了解有助于我们理解整体流程中的关键代码。
参考
- Electron Application Architecture
- 你不知道的 Electron (一):神奇的 remote 模块
- Dive Into Code: VSCode 源码阅读(一)
- 十几行代码实现一个 ts 依赖注入
- 细数 Javascript 技术栈中的四种依赖注入
- VSCode 源码解读-Workbench
- 详解 VS Code 依赖注入的原理与实现
写这些代码也许就一两个小时的事,写一篇大家好接受的文章需要几天的酝酿,如果文章对您有帮助请我喝杯咖啡吧!